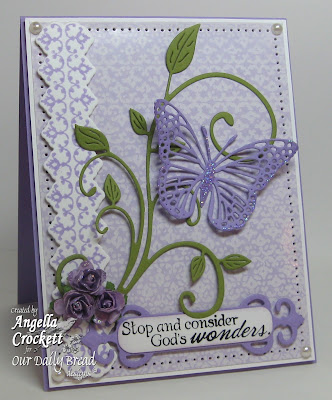
Hi, everyone! This week's Color Challenge over at Splitcoast is to use Melon Mambo, Pear Pizzazz, and Blushing Bride with the 'dessert' option of foliage. For my card, I used the following ODBD Custom Dies: Frangipani, Bitty Borders, Inspiration Words, and Pierced Rectangles. The light pink panel was dry embossed with striped embossing folder so that I may also submit this to the Fan Club Central Theme Challenge for November.
Thanks for stopping by!
Blessings,
Showing posts with label Dry Embossing. Show all posts
Tuesday, December 4, 2018
Friday, October 20, 2017
Let's Roll!
Hi, everyone! Today I would like to share a birthday card for one of my nephews...his fave toy is a red truck so I chose the 'Special Boy' set from Our Daily Bread designs. For the embossed background, I ran a cardstock panel through my Xyron, adhered a piece of aluminum foil to it, used a diamond-plate embossing folder on it, then cut it out with the ODBD Custom Pierced Rectangles Dies set. The image panel was cut out with the ODBD Custom Pierced Squares Dies. The image was colored with SU markers and the sky was sponged over a template cut with the ODBD Custom Clouds and Raindrops Dies. Silver brads and black gingham ribbon were used for finishing touches. I will be submitting this to the Falliday Fest Forest Ranger 'recycling' challenge and for the October Fan Club theme since I used my Xyron machine.
Thanks for visiting with me today!
Blessings,
Thanks for visiting with me today!
Blessings,
Labels:
boy birthday,
Dry Embossing,
F4A,
masculine,
ODBD,
ODBD Custom Cutting Dies,
recycling,
SCS Fan Club
Thursday, October 19, 2017
Pink Birthday Chicken
Hi, everyone! This week's Ways To Use It Challenge over at Splitcoast is to feature a pink animal on your card. Since I needed a birthday card for one of my nieces, I chose the Stampin Up set, 'Hey Chick!' and colored her tail and top feathers with pink. The white panel was dry embossed with a bubble folder then cut out with the ODBD Custom Double Stitched Rectangles Dies, matted with the ODBD Custom Rectangles Dies. The image panel was cut out with the ODBD Custom Stitched Ovals Dies and matted with the ODBD Custom Ovals Dies. I finished it off with some pink sequins and pink baker's twine which I just bought at JoAnn's yesterday...talk about perfect timing!! I will also be submitting this to the Falliday Fest LMcAree 'Birds of a Feather' Challenge.
Thanks for stopping by!
Blessings,
Thanks for stopping by!
Blessings,
Labels:
Dry Embossing,
ODBD,
ODBD Custom Cutting Dies,
Stampin Up
Saturday, September 24, 2016
Fly Like A......Turtle?!
Happy Saturday, everyone! This week's Inspiration Challenge over at Splitcoast is to find inspiration from the 'Digital Pencil Too' site....so many fun digi images there! I bought this cute turtle stamp from Hobby Lobby to make my nephew's birthday card (since he requested a turtle theme), but had no idea what I was going to do with it, UNTIL I saw this adorable digi set from the inspiration site! Making this card actually made me giddy!!! Three balloons were cut from the ODBD Custom Balloons and Streamers Dies set; the clouds were sponged over a template cut from the ODBD Custom Clouds and Raindrops Dies set; the sentiment is from an ODBD set, Keep Climbing, and was cut out with the ODBD Custom Ovals Dies set, matted with the ODBD Custom Pierced Ovals Dies. The olive frame was dry embossed then cut out with two dies from the ODBD Custom Pierced Rectangles Dies. A clear glaze pen was used for the eyes and sections of the shell to make them shiny.
Thanks for visiting with me!
Have a blessed weekend!!
Thanks for visiting with me!
Have a blessed weekend!!
Sunday, December 27, 2015
'Heart and Soul' Hello
Hi, everyone! This week's Featured Stamper is Pat aka pvilbaum.....congrats, Pat!!! I chose this beautiful and creative card to re-create.....the partial embossing and negative die cut really 'flipped my switch'! ;) For my card, I embossed the top and bottom of the pink cardstock with a floral embossing folder, used my Scor-buddy to score a separation line, created the cut-outs using the ODBD Custom Hello Die and ODBD Custom Clouds and Raindrops Dies, matted the panel onto a floral/heart pattern from the ODBD Heart and Soul Paper Collection, added paper piercing and pearls, then popped up the finished panel with foam tape over the Regal Rose card base.
Thanks for visiting with me!
Blessings,
Thanks for visiting with me!
Blessings,
Saturday, December 26, 2015
Blessings In Blue!
Hi, everyone! This week's Inspiration Challenge at Splitcoast is to find inspiration from the Anthropologie website.....I am a sucker for any blue and white dishes, so I chose this gorgeous side plate for inspiration in the making of my card. I have used the Be Joyful set from Our Daily Bread designs since I thought that the flowers were similar to the inspiration piece. The edges of the plate had scored lines, so I used a striped embossing folder on white cardstock, then finished the panel by using the ODBD Custom Double Stitched Rectangles Dies to cut it out. I also used the ODBD Custom Double Stitched Circles Dies set...I love how the stitched pattern gives a finished look without having to add paper piercing to everything....yay!
Thanks for stopping by!!
Blessings,
Thanks for stopping by!!
Blessings,
Tuesday, April 15, 2014
"Faux Pressed Flowers" Tutorial!
Hi, everyone! This is a card I made a year and a half ago for the Our Daily Bread designs Blog for a tutorial on the "Faux Pressed Flower" Technique....for supplies used and technique info, see the tutorial here. For some reason, I never got around to posting it to my blog or galleries. When I saw the Color Challenge over at Splitcoast (vanilla, pink, and light green), I jumped at the chance to post the card finally.
Thanks for visiting today!
Blessings,
Blessings,
Labels:
cheery lynn designs,
Dry Embossing,
ODBD,
SCS Color Challenge,
Tutorials
Thursday, February 6, 2014
Beautiful Wishes
Hi, everyone! Today's Ways To Use It Challenge is to do some coloring on your project. I know that white is not a color, but I did spend a good while coloring the dry embossed flowers with a chalk marker....does that count? This is a birthday card for a co-worker who loves anything purple, but doesn't like a big fuss, so I cased one of my own CAS cards which I made a few months ago, but in pink instead of purple....check it out HERE. The stamp I used is from the Our Daily Bread designs "Sentiments Collection 2", embossed in white. If you look close, you can see a bit of Pearl Glimmer Mist....I love how it looks against colored cardstock...yummy!
Thanks for stopping by today!
Blessings,
Thanks for stopping by today!
Blessings,
Saturday, January 4, 2014
Blessings in a Bottle
Hi, everyone!! Today's Inspiration Challenge over at Splitcoast is to choose a photo from GirlGeek's Nitey Nite Pinterest board.....I fell in love with these gorgeous pajamas.....used to have some similar to this....back in my "thinner" days....nowadays my style is more about flannel bottoms and men's pocket tshirts! :)
The "Apothecary Bottles" image and ODBD Custom Apothecary Bottles Die Set, plus the bottle label from "Joy in a Jar", were released on January 1st from Our Daily Bread designs. The bottle was colored with a sponge dauber and blue ink. The bottle label was stamped onto vellum, then cut out with the ODBD Custom Antique Labels and Border Die Set, then ran through a Xyron sticker maker, and adhered it to the bottle. The embossed background was created by using an embossing mat along with the ODBD Quatrefoil Pattern Cutting Die, which pressed the design into the paper without cutting.
Thanks so much for stopping by!
Blessings,
The "Apothecary Bottles" image and ODBD Custom Apothecary Bottles Die Set, plus the bottle label from "Joy in a Jar", were released on January 1st from Our Daily Bread designs. The bottle was colored with a sponge dauber and blue ink. The bottle label was stamped onto vellum, then cut out with the ODBD Custom Antique Labels and Border Die Set, then ran through a Xyron sticker maker, and adhered it to the bottle. The embossed background was created by using an embossing mat along with the ODBD Quatrefoil Pattern Cutting Die, which pressed the design into the paper without cutting.
Thanks so much for stopping by!
Blessings,
Tuesday, December 31, 2013
Jar of Jellybeans
Hi, everyone! This week's Clean and Simple Challenge over at Splitcoast Stampers is to choose a card from Jen's gallery (Miss Boo) and recreate it in a CAS fashion. I chose this beautiful card from her gallery....I loved the colors, the polka dots, the corner punch, and perfect paper piercing. My card did not end up as CAS as originally planned, but here it is!
I have used several stamp sets and dies from Our Daily Bread designs in the making of this card. The largest jar from the "Canning Jars" set was stamped and cut out with the ODBD Custom Canning Jars Die Set, the "jellybeans" are from the "Canning Jar Fillers 2" set (these are actually regular beans, but I colored them red and coated them with Glossy Accents). The jar cover, banner, and corner embellishment (cut out with the Ornate Borders and Flower Die Set) were all stamped with the Gingham Background. The sentiment is from the "Little Girls" set.
Thanks for visiting with me today! Come on back first thing in the morning for the ODBD January New Releases!!!! Yay!!!
Have a safe and blessed New Year!!
I have used several stamp sets and dies from Our Daily Bread designs in the making of this card. The largest jar from the "Canning Jars" set was stamped and cut out with the ODBD Custom Canning Jars Die Set, the "jellybeans" are from the "Canning Jar Fillers 2" set (these are actually regular beans, but I colored them red and coated them with Glossy Accents). The jar cover, banner, and corner embellishment (cut out with the Ornate Borders and Flower Die Set) were all stamped with the Gingham Background. The sentiment is from the "Little Girls" set.
Thanks for visiting with me today! Come on back first thing in the morning for the ODBD January New Releases!!!! Yay!!!
Have a safe and blessed New Year!!
Labels:
CAS,
cheery lynn designs,
Dry Embossing,
Gingham,
ODBD,
ODBD Custom Cutting Dies
Friday, November 22, 2013
A Look Back at the ODBD November New Release
Hi, everyone!! Today, we are looking back at the new stamps and dies which were released by Our Daily Bread designs on November 1st. For my sample today, I have used The Earth set, along with five different cutting dies from the new ODBD Custom Circle Ornaments Die Set...can you find all of the dies I used from the set shown below?
I have included two different photos, since metallics are so difficult to photograph. The first photo shows how awesome the copper embossed earth image turned out, but the 2nd really shows off the copper mirror paper, from which the shapes were cut. I couldn't decided between the two photos, so I left them both! :)
For added copper effects, after stamping the earth on the white strip with blue ink, copper embossing powder was sprinkled over the panel and heated from the under side of the cardstock to melt it to the paper. Why heat the underside, you ask? Answer: so that the embossing powder would not blow off from the gust of the heat tool. Please click on one of the photos if you'd like to see a close up of the sprinkles.
If you'd like to see more samples from the November sets, please visit my designer sisters below (and leave some love too!)
Grace
Julie
Angie...you are here!
Dawn
Chris
Cathy
Sabrina
Sandee
Lori
Thanks for visiting!!!
Blessings,
I have included two different photos, since metallics are so difficult to photograph. The first photo shows how awesome the copper embossed earth image turned out, but the 2nd really shows off the copper mirror paper, from which the shapes were cut. I couldn't decided between the two photos, so I left them both! :)
For added copper effects, after stamping the earth on the white strip with blue ink, copper embossing powder was sprinkled over the panel and heated from the under side of the cardstock to melt it to the paper. Why heat the underside, you ask? Answer: so that the embossing powder would not blow off from the gust of the heat tool. Please click on one of the photos if you'd like to see a close up of the sprinkles.
If you'd like to see more samples from the November sets, please visit my designer sisters below (and leave some love too!)
Grace
Julie
Angie...you are here!
Dawn
Chris
Cathy
Sabrina
Sandee
Lori
Thanks for visiting!!!
Blessings,
Labels:
Dry Embossing,
heat embossing,
masculine,
ODBD,
ODBD Custom Cutting Dies
Sunday, November 17, 2013
Wonderful Razzleberry World!
Hi, everyone! This week's Queen for the Day is Susie Nelson....congrats, Susie!!! Her gallery at Splitcoast is chock full of beautiful cards! I finally decided on this gorgeous card to re-create.....I loved the stamped background and general layout of this card. The stamped background on my card is the "Vintage Pattern Mini 2" Background stamp and the sentiment is from "The Earth", both by Our Daily Bread designs. The ivory sentiment panel was cut out with the ODBD Custom Antique Labels and Border die set; the razzleberry mat was cut by hand after tracing the outside edge of the same die. The razzleberry ribbon was tied with a Bow Easy.
Thanks for dropping by!
Blessings,
Thanks for dropping by!
Blessings,
Labels:
backgrounds,
CAS,
Dry Embossing,
Fussy Cutting,
ODBD,
qftd,
Queen For The Day,
Quick Cards
Saturday, November 16, 2013
CAS Beautiful Wishes
Hello there! Happy Saturday!! I sooooo love Saturdays.....not just because I don't have to go to work, but I LOVE to play along with the Inspiration Challenge at Splitcoast each week. This week, we are to choose a photo from a Japanese blog, Nunu's House, about miniature houses and their decorations.....wow, talk about artwork!! I chose this pink cake with white flowers. I love this Sizzix embossing folder because it makes Clean and Simple cards so quick and easy! The pink cardstock was embossed with the folder, then the flowers and stems were colored with an SU Chalk Pen. I was going to add some white ribbon, but decided that the pearls and paper piercing were the only embellishments needed. The sentiment is from the Our Daily Bread designs "Sentiments Collection 2" set, heat embossed with white embossing powder.
Thanks for visiting with me today!
Have a beautiful weekend!!
Blessings,
Thanks for visiting with me today!
Have a beautiful weekend!!
Blessings,
Labels:
CAS,
clean and simple,
Dry Embossing,
heat embossing,
IC,
Inspiration Challenge,
ODBD
Tuesday, September 4, 2012
"Faux Pressed Flowers" and Blog Candy Winner!
Hi everyone! It's back to work for me today, but I had a wonderful weekend playing in the Operation Write Home Virtual Card Making Party challenges! Thank you to everyone from OWH for your hard work and to all of the fabulous guest hostesses for making this a grand weekend!!
Since I was the guest-host for the September OWH / Our Daily Bread Designs challenge, I offered up some blog candy for those who commented on my blog for this challenge post. Random.org has chosen.......
Congrats, Marsha!!!! Please send me an email: angelladcrockett at yahoo dot com and I will ship your goodies out to you!!
My card sample today is one I created during the "Faux Pressed Flowers" Tutorial I did for the Our Daily Bread designs Blog....check out the tutorial HERE.
Card 'Ingredients':
Stamps: Our Daily Bread designs 'Mother's Day' (flower stem and leaves) and 'Scripture Series 2';
Cardstock: Stampin Up 'Red Riding Hood' and 'Whisper White';
Designer Paper: My Mind's Eye 'Rosy';
Ink: Stazon Jet Black, Ranger Antique Linen (sponging), Stampin Up 'Riding Hood Red' and 'Pear Pizazz';
Accessories: Silk flower, Xyron Sticker Maker Machine, Stampin Up/Sizzix 'Square Lattice' Embossing Folder, Spellbinders Lacey Ovals and Oval Nestabilities dies, Cheery Lynn Designs 'Border Carnivale', Baker's Twine, Zva Creative Pearls, Stampin Up Vintage Brad, Paper Piercer (freehand on oval) and template for edges, foam tape, sponge daubers;
Size: 4-1/2 x 6.
Thanks for stopping by! God bless!
Since I was the guest-host for the September OWH / Our Daily Bread Designs challenge, I offered up some blog candy for those who commented on my blog for this challenge post. Random.org has chosen.......
Congrats, Marsha!!!! Please send me an email: angelladcrockett at yahoo dot com and I will ship your goodies out to you!!
My card sample today is one I created during the "Faux Pressed Flowers" Tutorial I did for the Our Daily Bread designs Blog....check out the tutorial HERE.
Card 'Ingredients':
Stamps: Our Daily Bread designs 'Mother's Day' (flower stem and leaves) and 'Scripture Series 2';
Cardstock: Stampin Up 'Red Riding Hood' and 'Whisper White';
Designer Paper: My Mind's Eye 'Rosy';
Ink: Stazon Jet Black, Ranger Antique Linen (sponging), Stampin Up 'Riding Hood Red' and 'Pear Pizazz';
Accessories: Silk flower, Xyron Sticker Maker Machine, Stampin Up/Sizzix 'Square Lattice' Embossing Folder, Spellbinders Lacey Ovals and Oval Nestabilities dies, Cheery Lynn Designs 'Border Carnivale', Baker's Twine, Zva Creative Pearls, Stampin Up Vintage Brad, Paper Piercer (freehand on oval) and template for edges, foam tape, sponge daubers;
Size: 4-1/2 x 6.
Thanks for stopping by! God bless!
Labels:
cheery lynn designs,
Dry Embossing,
ODBD,
Operation Write Home,
OWH,
Tutorials
Thursday, July 19, 2012
Our Daily Bread designs "For The Love of ODBD Embossing Plates" Blog Hop!
Happy Thursday, everyone! Welcome to the "Our Daily Bread designs 'For the Love....' Blog Hop"! This time around we are focusing on the three gorgeous embossing plates by Our Daily Bread designs! As you hop around to each designer today, you will see various styles and techniques used with the embossing plates.
If you have hopped here from Connie McCotter's awesome blog, you are in the right place.....if not, please head over to the ODBD Blog, where you can start at the beginning. All of the details are there about how to win a prize, plus the full link list in case you get lost along the way. You have until Wednesday, August 1st to complete this hop. One commenter will be chosen to win a $15 gift certificate to the Our Daily Bread designs online store....yay!!
I went hog-wild and made a sample using each of the three ODBD Embossing Plates, since I couldn't decide on just one! The first is with the Butterfly Embossing Plate, which I paired up with some Cheery Lynn Designs Butterfly dies and the "Birthday Blessings" set. I used "Basic Dry Embossing" to create the butterfly background....check out the instructional video and "sandwich recipes" HERE to get the best results with the embossing plates.
Card 'Ingredients':
Stamps: Our Daily Bread designs 'Birthday Blessings';
Cardstock: Stampin Up 'Pink Passion' (retired) and Whisper White;
Designer Paper: Basic Grey 'Green at Heart';
Ink: Stazon 'Fuschia Pink';
Accessories: ODBD Butterfly Embossing Plate, Cheery Lynn Designs 'Exotic Butterflies Small', 'Star Dust Stickles', Zva Creative Pearls, Paper Piercer and template, foam tape;
Size: A2.
Challenges used in the making of this card:
Clean and Simple Fall-to Sketch;
Moxie Fab Birthday Challenge;
Stampin Royalty: Anything Goes.
My second sample features the Fish Embossing Plate and the "Surging Sea" stamp set. The technique I used for the background is "Inked Debossing". The basics of "de-bossing" are the same as "dry embossing", but the opposite side of the cardstock, the negative impression, is utilized instead of the raised impressions. To get the effect shown on my sample below, I carefully inked the raised surface of the plate with a navy blue ink pad, laid the cardstock on top, laid one embossing mat on top, then ran through my Grand Calibur to de-boss the fish pattern into the cardstock. The edges were torn then inked for a more rustic look which matched the ship image.
Card 'Ingredients':
Stamps: Our Daily Bread designs 'Surging Sea';
Cardstock: Stampin up 'Night of Navy', 'Cajun Craze', and 'Very Vanilla';
Ink: Stampin Up 'Night of Navy' and 'Cajun Craze';
Accessories: ODBD 'Fish Embossing Plate', May Arts Twill Ribbon, Stampin Up Linen Thread, Zva Creative Navy Pearls, Foam Tape, Sponge Daubers;
Size: A2.
I will be submitting this card to the ODBD Bible Verse Thursday Challenge at the ODBD Forum....this week's challenge is Finding Strength and Contentment in the Lord.
My last sample for today features the "Vintage Border Embossing Plate" and the "Porch" stamp set. The Vintage Border stamp in the "Porch" set was cut out with a custom "Vintage Border Die" ....check out all of ODBD's custom cutting dies HERE. The technique I used for the background is the "Wax Paper Resist" technique....check out some fun techniques with Wax Paper Resist HERE in this video tutorial I did for the ODBD Blog. Here is the Grand Calibur 'sandwich' I used: Base Plate, scratch paper, embossing plate face up, wax paper, scratch paper, one (thin) embossing pad, Pink Top Plate. Note: the two layers of scratch paper were used to keep the wax paper off of the plates and embossing pad. Run through the Grand Calibur die cut machine and the pattern from the embossing plate transfers to the wax paper. Use an iron to transfer the wax paper pattern to glossy card stock (once again, use scratch paper between the wax paper and iron to keep your iron clean). Use a sponge or brayer to color in the background of the glossy paper and your background is done!!
Card 'Ingredients':
Stamps: Our Daily Bread designs 'Porch';
Cardstock: Stampin Up 'Lavender Lace' (expired) and Whisper White;
Ink: Stampin Up 'Lavender Lace';
Accessories: ODBD 'Vintage Border Embossing Plate', 'Vintage Border' custom cutting die, Spellbinders Fancy Tags, Cheery Lynn Designs Fanciful Flourish and Exotic Butterflies Small, Zva Creative pearls and roses, Star Dust Stickles, Wax Paper, Iron, Sponge Daubers, Paper Piercer and Template, Prima Flowers;
Size: A2.
I have used the following challenges in the making of this card:
Stampin Sisters in Christ: Sparkle;
Papertake Weekly: All Things Girly;
ABC Challenge: T is for2 of something....I used two stamps.
Now....on with the hop!!!! Get ready to be amazed! Sweet Grace Nywening has some incredible samples to share with you!!!
Enjoy the rest of the hop! Have a very blessed day!!!
If you have hopped here from Connie McCotter's awesome blog, you are in the right place.....if not, please head over to the ODBD Blog, where you can start at the beginning. All of the details are there about how to win a prize, plus the full link list in case you get lost along the way. You have until Wednesday, August 1st to complete this hop. One commenter will be chosen to win a $15 gift certificate to the Our Daily Bread designs online store....yay!!
I went hog-wild and made a sample using each of the three ODBD Embossing Plates, since I couldn't decide on just one! The first is with the Butterfly Embossing Plate, which I paired up with some Cheery Lynn Designs Butterfly dies and the "Birthday Blessings" set. I used "Basic Dry Embossing" to create the butterfly background....check out the instructional video and "sandwich recipes" HERE to get the best results with the embossing plates.
Card 'Ingredients':
Stamps: Our Daily Bread designs 'Birthday Blessings';
Cardstock: Stampin Up 'Pink Passion' (retired) and Whisper White;
Designer Paper: Basic Grey 'Green at Heart';
Ink: Stazon 'Fuschia Pink';
Accessories: ODBD Butterfly Embossing Plate, Cheery Lynn Designs 'Exotic Butterflies Small', 'Star Dust Stickles', Zva Creative Pearls, Paper Piercer and template, foam tape;
Size: A2.
Challenges used in the making of this card:
Clean and Simple Fall-to Sketch;
Moxie Fab Birthday Challenge;
Stampin Royalty: Anything Goes.
My second sample features the Fish Embossing Plate and the "Surging Sea" stamp set. The technique I used for the background is "Inked Debossing". The basics of "de-bossing" are the same as "dry embossing", but the opposite side of the cardstock, the negative impression, is utilized instead of the raised impressions. To get the effect shown on my sample below, I carefully inked the raised surface of the plate with a navy blue ink pad, laid the cardstock on top, laid one embossing mat on top, then ran through my Grand Calibur to de-boss the fish pattern into the cardstock. The edges were torn then inked for a more rustic look which matched the ship image.
Card 'Ingredients':
Stamps: Our Daily Bread designs 'Surging Sea';
Cardstock: Stampin up 'Night of Navy', 'Cajun Craze', and 'Very Vanilla';
Ink: Stampin Up 'Night of Navy' and 'Cajun Craze';
Accessories: ODBD 'Fish Embossing Plate', May Arts Twill Ribbon, Stampin Up Linen Thread, Zva Creative Navy Pearls, Foam Tape, Sponge Daubers;
Size: A2.
I will be submitting this card to the ODBD Bible Verse Thursday Challenge at the ODBD Forum....this week's challenge is Finding Strength and Contentment in the Lord.
My last sample for today features the "Vintage Border Embossing Plate" and the "Porch" stamp set. The Vintage Border stamp in the "Porch" set was cut out with a custom "Vintage Border Die" ....check out all of ODBD's custom cutting dies HERE. The technique I used for the background is the "Wax Paper Resist" technique....check out some fun techniques with Wax Paper Resist HERE in this video tutorial I did for the ODBD Blog. Here is the Grand Calibur 'sandwich' I used: Base Plate, scratch paper, embossing plate face up, wax paper, scratch paper, one (thin) embossing pad, Pink Top Plate. Note: the two layers of scratch paper were used to keep the wax paper off of the plates and embossing pad. Run through the Grand Calibur die cut machine and the pattern from the embossing plate transfers to the wax paper. Use an iron to transfer the wax paper pattern to glossy card stock (once again, use scratch paper between the wax paper and iron to keep your iron clean). Use a sponge or brayer to color in the background of the glossy paper and your background is done!!
Card 'Ingredients':
Stamps: Our Daily Bread designs 'Porch';
Cardstock: Stampin Up 'Lavender Lace' (expired) and Whisper White;
Ink: Stampin Up 'Lavender Lace';
Accessories: ODBD 'Vintage Border Embossing Plate', 'Vintage Border' custom cutting die, Spellbinders Fancy Tags, Cheery Lynn Designs Fanciful Flourish and Exotic Butterflies Small, Zva Creative pearls and roses, Star Dust Stickles, Wax Paper, Iron, Sponge Daubers, Paper Piercer and Template, Prima Flowers;
Size: A2.
I have used the following challenges in the making of this card:
Stampin Sisters in Christ: Sparkle;
Papertake Weekly: All Things Girly;
ABC Challenge: T is for2 of something....I used two stamps.
Now....on with the hop!!!! Get ready to be amazed! Sweet Grace Nywening has some incredible samples to share with you!!!
Enjoy the rest of the hop! Have a very blessed day!!!
Monday, December 28, 2009
CASE-ing Marcelle - Inked Cuttlebug
Hi everyone!! For the month of December, our Design Team members over at Christian Paper Crafts have each been featured for Case Artist Saturday. This card I CASED from my dear friend, Marcelle, who is also on the DT for the Cuttlebug Spot. I chose this awesome card to copy since I've been dying for a chance to try out my new "Stars" embossing folder. Today, over at the Our Daily Bread designs blog, you will see a Product Review article I wrote on the Cuttlebug embossing folders, plus some awesome samples showing different ways to use them.
For some of you, inking your embossed panels is a technique with which you are familiar, however, I thought I would show just how easy it is. Since I "exploded" my Cuttlebug machine earlier this year, here is the sandwich recommended for the Spellbinders Wizard: Bottom plate, Cuttlebug folder with paper, embossing mat, blue plate (from the Spellbinders Charm Embossing Kit). I have, in the past, used the two white plates only with the Cuttlebug folders, however, it takes a lot of force to crank the Wizard and I personally would rather not put that much pressure on it.
Once you emboss your cardstock, you can either use a stamp pad, sponge daubers, brayer, or even chalks to highlight the raised images. I used a small ink pad directly to the stars. To ensure a "clean" look, make sure your ink pad or brayer does not press into the debossed areas. I wanted a "dirty", or "rustic", look for this project, so I did not worry about keeping the ink just on the stars.
I then embossed and inked a smaller piece, in order to cut out one of the stars to embellish the ribbon. The sentiment is from the ODBD set, "Happy Birthday" ;the satin ribbon is by May Arts.
Thanks for stopping by today!!! Have a blessed week!!!
Labels:
Dry Embossing,
Inked Embossing,
ODBD,
Product Review
Subscribe to:
Posts (Atom)