Tuesday, October 1, 2024

Divinity Designs LLC October/November New Release!

Hi, everyone! The New Release over at Divinity Designs LLC is so epic that it will be shared through November!  Since I work full time, I was only able to use a small portion of the goodies, but you can see them all HERE on the website or HERE on Instagram.  Enjoy!!

My first card features the Hot Cocoa Stamp/Die Duo set, along with one of the beautiful scenes from the Silent Snowfall A2 Card Fronts pack. Other items used: A2 Pierced Triple Window, Sentiment Strips 2, Matting Rectangle, A2 Landscape Card Base with Layer, Foam Mounting Tape, Blending Brushes.
Next up is another beautiful winter scene from the Silent Snowfall A2 Card Fronts, along with the Rejoice Stamp/Die Duo set.  Other items used: Matting Rectangle, Mini Slimline Rectangles, Mini Slimline Scalloped Rectangles, A2 Landscape Card Base with Layer, Blending Brushes, and Foam Mounting Tape.
My next card is super simple but is one of my faves.  I love this peaceful scene from the Silent Snowfall A2 Card Fronts pack, with a fabulous color combo of lavender and navy!  I used lavender foil cardstock for the Treat Tags Die and Ornamental Rectangle Die.  Other items used: Sentiment Strips, A2 Landscape Card Base with Layer, Foam Mounting Tape.
And lastly, I would like to share a fun gift bag created with the Gift Giving Goodie Bag Die Set.  The leaves are beginning to show their beautiful colors here in Indiana, so I wanted to create a fall themed project.  The designer paper used for the Goodie Bag layers is from the Festive Fall Slimline Paper Pad. Also featured is the new Stitched Tag Die Set and the Bitty Blossoms Dies.
We will be sharing new projects from this release throughout October and November. Stay tuned! Thanks for hanging out with us today! 

 Blessings,

Tuesday, September 24, 2024

Pink Sky Plains

Hi, everyone!  This week's Color Challenge over at Splitcoast is to use Powder Pink, Moody Mauve, and Night of Navy.  I had a stack of various silhouette images which were already stamped with Stazon Jet Black, so all I had to do was blend the background with the three colors.  The image is from 'Howdy' and the sentiment is from 'Happy Trails', both from Divinity Designs LLC. Three pink milk dots were added for a simple embellishment.  This card with go into my birthday card stash.


Thanks for stopping by!

Blessings,


Tuesday, September 17, 2024

More Fun Samples from Divinity Designs LLC Blessings Box!

Hi, everyone! Here is one more round of samples for the July Blessings Box from Divinity Designs LLC. I had so much fun with these products and will continue to use them for many of my personal cards!
My first sample incorporates the Blessings Box goodies, the Fractured Quilt Background Die from the September New Release, but the fun Busy Bee Dies.  I love the tiny bees in this paper so I just had to break out the Busy Bees!
My next sample combines the Blessings Box goodies, along with the Fence Die, Bitty Blossoms Dies, and a cloud stencil created with the Clouds and Raindrops Dies. The designer paper strip was cut with one of the layering dies from the Accordion Fold with Layers Dies.
For my third sample, I used the Mini Cups and Mugs Dies to cut a smaller cup of lemonade plus a tiny straw!  The bench is from the Park Silhouettes Dies.
Thanks for stopping by!

Blessings,

Thursday, September 5, 2024

Divinity Designs LLC Birthday Flower of the Month - September

Hi, everyone! It's time to reveal September's Birthday Flower of the Month....the Aster!  If you haven't already subscribed, check out how to get yours....HERE!  I love that you can find Asters in just about any color; one of my samples shows the traditional lavender tones, but I went a bit wild on the 2nd! :)

For my first sample, the Aster was stamped onto white vellum; the back side was colored with markers. An adhesive sheet was added to the vellum before cutting with the coordinating die. I love this technique since it creates a glow-y effect, especially the white sections.  Here are the other items used for this card: Peaceful Petals Paper Pad, Foam Mounting Tape, Adhesive Sheets, and the following dies: Double Stitched Rectangles, Rectangles, Matting Rectangle, A2 Portrait Card Base with Layer.  The satin bow was tied with a Bow Easy and lavender glitter gems were added for the finishing touch. 
My second sample was created around the designer paper.....I looked through my paper collection until I found a pattern which "spoke" to me, from the Beauty in Bloom Paper Pad! The asters were stamped with Stazon Jet Black onto white cardstock, the centers were colored with a marker then sealed with a clear glaze pen. The flowers were colored with markers and blending brushes. The vase was created by cutting the designer paper with one of the dies from the Shining Light Lantern Die Set.  Here are the other items used for this card: Foam Mounting Tape, Blending Brushes, Mini Slimline Card Base, Mini Slimline Scalloped Rectangles, Mini Slimline Thin Pierced Frame.  
Thanks for visiting today!

Blessings,

Sunday, September 1, 2024

Divinity Designs LLC September New Release

Hi, everyone!  Wow, the summer flew by and now it's September!!  We have another fabulous release for you.....check out the entire new release and fabulous samples HERE on the website and HERE on Instagram.


My first sample features the Simple Things clear stamp set, Quilted Carpenters Wheel Die, a pattern from the Pretty Posies Paper Pad, the Cross Stitch Embossing Folder and the following dies: Pennant Flags, Double Stitched Pennant Flags, Matting Rectangle, and A2 Portrait Card Base with Layer.  When working with quilt dies, I always start by cutting a panel the same size as the quilt, adding an adhesive sheet, then adhering all of the pieces of the quilt as I cut them.
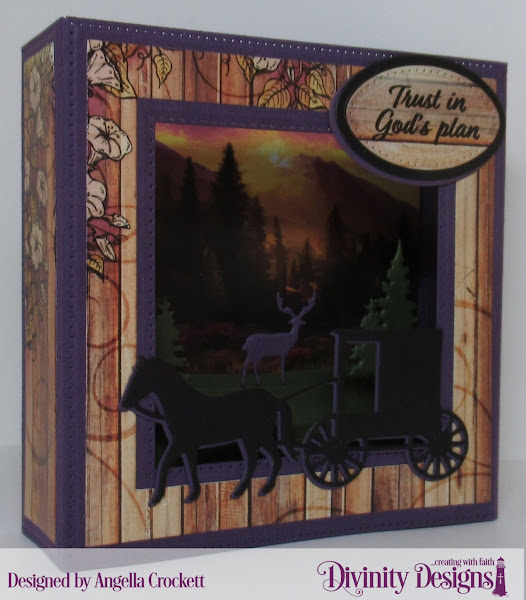
Next up is a diorama scene featuring the Simple Things clear stamp set, the Amish Horse & Buggy Die, along with the following items: Rustic Garden Paper Pad, Majestic Mountains Slimline Card Fronts, Diorama with Layers Die Set, Ovals Dies, Pierced Ovals Dies, Curvy Slopes Dies, Trees & Deer Dies.
My third sample features the Simple Things clear stamp set, the Amish Horse and Buggy Die, the Fractured Quilt Background Die, along with the Stoneware Paper Pad, Double Stitched Ovals Dies, Ovals Dies, the Matting Rectangle Die, A2 Portrait Card Base with Layer Dies and Adhesive Sheets to adhere the pieces of the quilt plus the vellum sentiment panel.
Thanks for visiting today!

Blessings,

Tuesday, August 27, 2024

To A Very Special Someone

Hi, everyone! This week's Color Challenge over at Splitcoast screams flowers!!! Here is the color swatch:
For my card today, after taking photos, I realized that I could ramp it up so I have included before and after photos.....please share your thoughts about which version you prefer. Here is the first version:
The word dies were carefully removed and placed at an angle. The corner bouquet was fussy cut from the same paper pack....there is no cutting die for this....wanted to give a disclaimer! :)
Here is a list of all of the items used, from Divinity Designs LLC: 

Stamps: Special Person
Dies: Someone Special, Ornamental Squares, Sentiment Strips 2, Squares, Square Card Base
Paper: Square Pairs Paper Pad
Misc: Foam Mounting Tape, Adhesive Sheets (for the die cut letters)

Thanks for stopping by!

Blessings,

Saturday, August 17, 2024

More Fun Samples with Divinity Designs LLC July Blessings Box!

Hi, everyone!  I'm still having a blast with this quarter's Blessings Box from Divinity Designs LLC! Check out all of the subscription details HERE!


This card was made for my sister's birthday. She loves the occasional margarita, so instead of going with the lemon theme, I went with limes!  The polka dot paper is from the Birthday Brights Paper Pad.  the sentiment was stamped on vellum and adhered with an adhesive sheet. Stickles were added to the glass to mimic salt.

My next sample shows how to create a different angle from the lemonade.....iced tea!!  The cute little gnome is holding a bowl of sugar and a spoon because she like sweet tea!!!  Those tiny dies are from the Mini Cups and Mugs Die set.
Next up is a quick card which shows off the fun strawberry paper and matching die.  I had to pair it with yellow gingham to give it a country feel.  I already had the strawberry die cut and glued together so this card only took about 15 minutes to complete....yay!!
Thanks for visiting!

Blessings,

Monday, August 5, 2024

Birthday Flower of the Month - August - Gladiola

Hi, everyone!  It's time to reveal the August Birthday Flower of the Month from Divinity Designs LLC.....it's the Gladiola!  Check out the details and see more samples HERE!  Gladiolas come in a countless number of different colors, so have fun coloring them any way you like!!!  


Along with the Birthday Flower of the Month August set, my first sample also features the Mini Slimline Flourishy Frame Die, Mini Slimline Scalloped Rectangles Dies, Mini Slimline Card Base, Foam Mounting Tape, Blending Brushes, and an Adhesive Sheet (to easily adhere the Flourishy Frame without messy glue.)  To color the gladiola, I created a reverse mask with scratch paper in order to color the flowers with a blending brush.  The other portions were colored with markers.  A Bow Easy was used to tie the orchid ribbon and clear gems were added as embellishments.


My second sample is an A2 card on which I used the following items: Beautiful Blooms Slimline Paper Pad; Dies: Bitty Borders, Butterfly Layering Combo 3, Scalloped Rectangles, Matting Rectangle, A2 Portrait Card Base with Layer, along with Foam Mounting Tape and Blending Brushes.  The flower was colored in the same manner, with the reverse mask and highlighted with markers. Before blending the pink, the stamen were colored yellow and sealed with a clear glaze pen. Glitter gems were added as a finishing touch.


Thanks for stopping by!

Blessings,


Thursday, August 1, 2024

Divinity Designs LLC August New Release!

Hi, everyone!  Welcome to the August new release party for Divinity Designs LLC! This release, in my opinion, is super elegant!  Check out all of the new products, plus more amazing designer samples HERE on the website or HERE on Instagram.


My first sample was a bit time-consuming, but so worth it!  To get this stained-glass effect, here are the steps: cut 5-6 panels with the Mini Slimline Flourishy Frame Die; "dry emboss" another panel with the die without cutting the sections; color (outside the lines a bit) on the "cut-out" areas with markers; adhere the five cut frames over the colored layer.  Add glossy accents or any clear glaze to the colored sections and make sure the glaze touches all of the sides.  Don't worry about being messy because one final layer will go on top to hide all of the glaze mess.  Once the glaze is completely dry, the panel may be a little warped.  I placed a couple of books on top of it overnight to flatten it back out. The rest of the card was simple. The sentiment from God Quotes 4 was stamped onto a panel cut with the Vintage Labels 2 Dies; a flower cut with Bitty Blossoms was added, along with some coral baker's twine.  The stained-glass panel was framed with a Mini Slimline Scalloped Rectangle, adhered to a Mini Slimline Card Base. I love the navy, lime-green, and coral combination....hope you do as well!


My next sample is a Slimline triple-shaker card which features a scripture verse from the God Verses 3 set, the Slimline Flourishy Frame Die, the Arches Shaker Dies set, and the following items: Butterfly Trio Dies, Slimline Pierced Rectangles Dies, Slimline Card Base, a pretty pattern from the Floral Favorites Slimline Paper Pad, Adhesive Sheets, Foam Mounting Tape, and a Blending Brush.  NOTE: using Adhesive Sheets with your intricate dies helps to adhere them with no glue mess; just apply an adhesive sheet to the back of your cardstock before cutting....works like a dream!!!


For my last sample, I used the Arches Shaker Set in an alternate manner....for a cool frame!  The sentiment from God Quotes 4 was embossed onto the scenic pattern from the Majestic Mountains Slimline Card Fronts pack, cut with the smaller arch, then matted with the next size arch. In order to fit the height of the A2 card, the arches were "resized".  Other items used for this card: Slimline Curvy Slopes Dies, Trees and Deer Dies, Cowboy and Cactus Silhouettes Dies, Pierced Rectangles Dies, Matting Rectangle, A2 Landscape Card Base with Layer, Blending Brushes, Foam Mounting Tape.


Thanks for hanging out with us today!

Blessings,