
Hi, everyone! For my card today, I have combined three challenges from Splitcoast Stampers....this week's Color Challenge of Cherry Cobbler, Blueberry Bushel and Bermuda Bay (dessert option of sparkle...I painted the images with Glimmer Mist after water-coloring them), this week's Sketch Challenge, plus the October Fan Club Central Theme Challenge since I have used a mermaid. I began by adding red, blue, and aqua alcohol inks onto Yupo paper and blended them together. The ODBD 'Chalkboard Fan' Background stamp was inked with Alcohol Lift Ink, stamped onto the yupo panel to lift the colors, then stamped onto white cardstock. Once the ink was transferred, the cardstock panel was cut out with the ODBD Custom Pierced Rectangles Dies. The stamps I used are from 'Happy Days Mermaids' from Your Next Stamp, which I won during the Dare To Get Dirty Challenges. After stamping the images and cutting them out with the custom dies, I tried something new (and not easy) and water-colored with rubbing alcohol and the same alcohol inks I used on the background panel. Since alcohol inks are permanent, they dry immediately and they are hard to blend as in normal water-coloring.

Thanks so much for visiting!
Blessings,
Hi, everyone! This week's Featured Stamper over at Splitcoast is Adriana aka fl_beachbum....congrats, Adriana! I loved every page of her gallery, but finally decided on this beautiful card to case....thought it would be a great design for trying out my new Alcohol Lift Ink pad and Yupo paper. The Yupo paper was inked up with three different alcohol inks; the 'Floral' background stamp from Stampin Up was inked with Lift Ink and stamped onto the inked panel. Once the image was lifted, it was stamped onto white cardstock while the alcohol panel was lightly buffed to reveal the floral image which had been lifted off. Each panel was then cut with the ODBD Custom Pierced Rectangles Dies for a finished look. Instead of using a sentiment strip, I chose to use the 'Amazing' word die (which I won from 'Your Next Stamp' in the DTGD challenges this year!) across the panel. Due to a slight measurement miscalculation of the word die, I was unable to place the panel on the edge of the card as Adriana did, so I moved it to the top corner instead. Die cut letters (Top Dog Dies) were added to complete each sentiment and two turquoise gems were added at the bottom. I couldn't decide whether I liked the ghost image or the stamped image best, so I made a card with each of them. (An added thanks goes out to Karen Dunbrook for inspiring me to try new techniques!)


Thanks for stopping by!
Blessings,
Hi, everyone! My card today combines this week's Inspiration Challenge (I chose this beautiful autumn quilt from Studio E Fabrics) plus this week's Friday Free4All Challenge is to make either a Halloween or a fall themed card. Since I do not celebrate Halloween, I chose to make a Thanksgiving card using the ODBD Custom Quilted Background Die, ODBD 'Follow the Son' Paper Collection, ODBD Custom Double Stitched Pennant Flags Dies and the 'A-Maize-Ing' stamp set and ODBD Custom Indian Corn Die.When I use any of ODBD's Quilt Dies, I love to use my Xyron Sticker Maker which makes adhering the inset pieces a breeze! Check out my instructions below:
First, cut a cardstock panel just a smidge smaller than the die cut frame of whichever quilt die you are using. Run it through a Xyron Sticker Maker machine. (Note: I usually use the same color paper as the quilt frame but for this tutorial, I used white so that it's more visible for photos.) If you don't have a sticker maker, you could use your snail adhesive but make sure you cover the entire surface so that none of your die cut pieces fall out later.
Once your sticker is made, peel off the backing and adhere the quilt frame to the panel.
Lay out all of the coordinating die cut pieces of the chosen patterns or colors so that it's easy to locate and insert the pieces. Make sure you have a good fit before pressing each piece onto the sticker background. Tip: When using multiple colors to fill in your quilt, try to use the same order all the way around the quilt and pay attention to the pattern so that you don't have two of the same colors next to each other.
Once the quilt is complete, press down on the frame and pieces to make sure they are all adhered well. Now it's time to decorate!
For my card sample, I have used the 'A-Maize-Ing' stamp set and ODBD Custom Indian Corn Die. I wanted to used a stitched die for the sentiment to coordinate with the quilt die, but I didn't have the right size.......so......I used the die-resizing technique to create the perfect die cut. Here is how you can make any size panel you want:
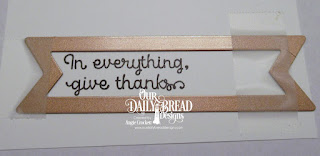


I stamped my sentiment first, then lined up the die from the ODBD Custom Double Stitched Pennant Flags Dies on one side of the sentiment. Removable scotch tape was used to hold the die in place then ran through my die cut machine. The panel was removed from the die, then lined up on the other end and taped down. (Note: if using pierced or stitched dies, make sure that the holes or the stitches line up or your finished die cut will look messy.) *****Important: when making your second cut, you only want to cut just the edge, so roll the plate just a bit and then reverse so that only the end of the panel cuts. You may emboss these types of cuts as well, just place the embossing mat and plate over half of the panel at a time.
Here is my finished card:
Thanks for visiting!
Blessings,
Hi, everyone! Our Daily Bread designs is offering Pre-Orders on the November New Release Bundles, plus bonus dies while supplies last! Check out all of the details HERE on the ODBD Blog. Shown below are photos and links to each of the bundles.
Here are the items featured in my card sample below:
My card today features the poinsettia image from the 'Joyful Christmas' Stamp/Die Duos set, a solid plus a pattern from the ODBD Christmas Paper Collection 2018, along with the ODBD Custom Alphabet Flags Dies and the ODBD Custom Large Banners Dies.
Thanks for visiting today!
God bless!
Hi, everyone! This week's Featured Stamper over at Splitcoast is Jennifer Jackson aka jenniferstamp04....congrats, Jennifer! Due to the puffy clouds and sentiment tag, I chose this adorable card to case today. I will be sending my card to a former co-worker who recently moved out of state. I have used the following items from Our Daily Bread designs to create this card for her: 'Home Sweet Home' stamp set and these ODBD Custom Dies: Neighborhood Border, Brick Gate Border, Cloud Borders, Curvy Slopes, and the Mini Tags and Labels Dies. The Neighborhood Border Die was cut from both green and burgundy cardstock. The burgundy houses were fussy cut then adhered over the green layer. The Brick Gate Border was cut out of a lighter burgundy, stenciled through the die, then the darker areas you see were colored with a marker.
Thanks for visiting!
Blessings,
Hi, everyone! Welcome to the new release party for Our Daily Bread designs! To see all of the new stamps and dies, more designer samples, and prize info, check out this post!
Here are the new and previously released items featured in my projects today:


My first project is a diorama card. I used to make these from scratch and it was very time consuming with all of the measuring and cutting. Now, the ODBD Custom Diorama with Layers Dies set cuts all of the pieces perfectly plus gives instructions on how to assemble it.....woo hoo!!!! Once assembled, the diorama folds to fit into an A6 size envelope...pretty amazing! I used burgundy cardstock to cut out the diorama frame, City Skyline border and Oval Die (mat) for the scripture verse. All of the white layers (Icicle Border, Snow Crystals, Curvy Slopes, and windows of the buildings) were cut out of Shimmery White cardstock....the camera did not reveal the shimmer unfortunately. Both the snowflake paper, scripture panel and backdrop to the city scene were all from the ODBD Christmas Paper Collection 2015. The scripture verse stamped onto the ODBD Custom Pierced Oval is from the 'Christmas Card Scriptures' set. Tiny yellow gemstones were added to coordinate with the gold tones in the paper.

Two borders were cut with the ODBD Custom Icicle Border Die....one was adhered to the inside and one to the outside of the diorama.

Next up is a nameframe which I made for my niece's birthday, using the new ODBD Custom Cloud Borders Dies, ODBD Custom Neighborhood Border Die, ODBD Custom Large Letters Dies, and the tiny hearts from the ODBD Custom Clouds and Raindrops Dies set. The gingham paper used for the letters and houses is from the ODBD Shabby Rose Paper Collection. To create the hillside, the Neighborhood Border was cut from the same piece of green cardstock twice. I just lined up the die with the first cut and used temporary tape to hold it in place for the 2nd cut. The die was used twice with the gingham designer paper, then the little houses were trimmed by hand and glued on top of the green panel. Since the trees were already green, I just highlighted them with markers. I used the same resizing technique with the clouds border so that it would reach across the frame in one continuous panel.


Here is a matching birthday card to go with the framed gift. I used the same ingredients as the frame, plus the ODBD Custom Large Numbers Dies, 'st' from the ODBD Custom Numbers Dies, and the HB sentiment from the ODBD Custom Happy Birthday Dies set. Once the scene was adhered together, the panel was cut out with the ODBD Custom Pierced Rectangles Dies.
Thanks so much for hanging out with us today!
Have a happy, blessed October!!


