Hi, everyone! This week's Inspiration Challenge over at Splitcoast is to find inspiration the Inspiring Tables Pinterest board.....I am always a sucker for royal blue, so I chose this awesome table setting. I used two of my neglected Stampin Up sets, Bitty Buds and So Many Sayings, along with the Blossom 3 SB Dies. I haven't made a shaped card in a while so this was fun. To help keep the outer flowers somewhat lined up, I traced a circle die with a blue marker and then began stamping. I did not use a stamp positioner....I just "went for it"...it's not perfectly symmetrical but I can live with it this time! The sentiment was stamped in blue and punched out with the Word Window punch. A tiny gingham bow, tied with a Bow Easy, was the finishing touch. This will go into my birthday stash.
Thanks for visiting today!
Blessings,
Saturday, February 29, 2020
Friday, February 28, 2020
The Right Direction
Hi, everyone! Happy Friday!! Today's Friday Free4All Challenge over at Splitcoast is 'Put A Bird On It'....I needed a quick masculine card to put in the mail, so I grabbed the 'Home' set by Artistic Outpost, plus designer paper from the Weathered Wood Collection and Double Stitched Rectangles Dies from Divinity Designs LLC. This was a very simple and quick card.....stamping, tearing, and lots of sponging on the edges, and a bit of linen thread and off it went into the mailbox.
Thanks for stopping by!
Blessings,
Thanks for stopping by!
Blessings,
Sunday, February 23, 2020
Birthday Bear Hugs
Hi, everyone! This week's Featured Stamper over at Splitcoast is Shelly aka mcschmidty...congrats, Shelly! I chose this super cute card to case today....the cowboy's pose with his arms outstretched reminded me of my favorite 'bratty bear' stamp, plus I LOVE the Faux Wood technique. For my card, I used the 'Under the Stars' set from Stampin Up, along with some letter stamps by EK Success which I bought at JoAnn's more than a decade ago. The bear was stamped and watercolored, then the panel was cut out with the Double Stitched Squares Dies from Divinity Designs LLC. A craft knife was used to cut slits so that the linen thread could wrap around his paws. The card base was swiped with a matching ink pad, creating a 'Faux Wood' background. Silver mini brads were added to the corners.
Thanks for visiting today!
Blessings,
Thanks for visiting today!
Blessings,
Sunday, February 9, 2020
Happiness Is Knowing You
Hi, everyone! This week's Featured Stamper over at Splitcoast is Brent aka brentsCards....congrats, Brent!! I chose this beautiful card to case today because of the watercolor background, beautiful butterfly, and delish colors....how could I resist? The stamp set I am using is a old favorite from my retired Stampin Up sets, 'Winged Things'. I created a Wrinkle Free Distress panel with similar colors, white embossed the butterfly and sentiment, then cut out the panel with a rectangle die. To coordinate with the tiny dots around the image, I used a white gel pen to add more dots to the background. Baker's twine and white sequins were added at the last. This will go into my birthday card stash for later.
Thanks for stopping by today!
Blessings,
Thanks for stopping by today!
Blessings,
Saturday, February 1, 2020
Divinity Designs LLC February New Release!
Hi, everyone! Where did January go?! Welcome to February and welcome to another new release from Divinity Designs LLC!!! The goods just keep on coming!! This month's release is SWEET.....check out the entire release and lots of gorgeous project samples HERE....enjoy!!
Here are the items I have used to create my two project samples for today:
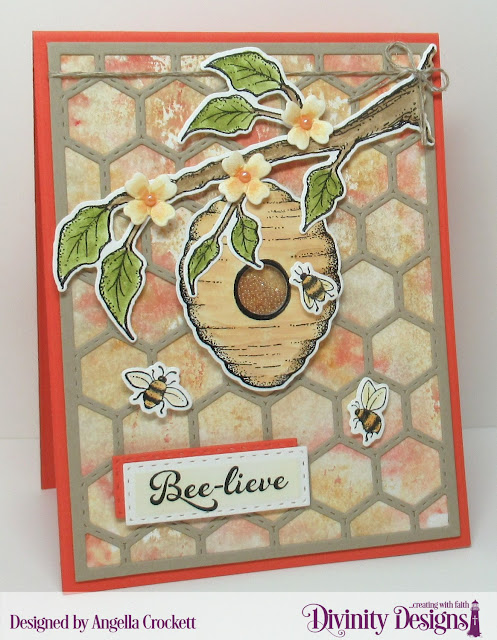
My first card was super fun to make!! I wanted to use bright, cheerful colors, so after the tangerine card base was cut out with the A2 Portrait Card Base with Layer Dies, I created a Wrinkle Free Distress (or Smoosh) panel with tangerine, mustard, and kraft inks on smooth white cardstock. Once the inked panel was dry, the frame, which was cut with the Quilted Honeycomb Background Die, was adhered over it. The images from the 'Bee-lieve' Stamp/Die Duos set were stamped in Stazon Jet Black, water-colored, and popped up with foam tape. The center of the bee hive was cut out with one of the button dies from the Sewing Set Dies so that it could become a shaker card with honey-colored micro beads inside. The tiny flowers were cut with the Ornamental Crosses Dies set. The sentiment was stamped on a panel cut with the Double Stitched Rectangles Dies. The same die was used to cut the offset mat behind it.
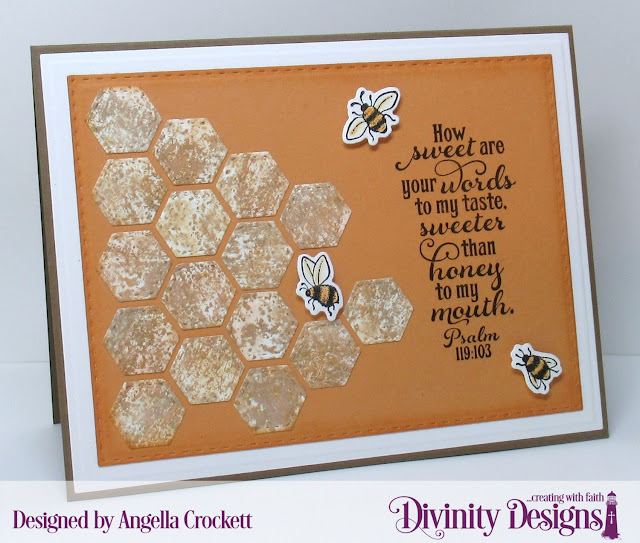
For my next card, the 'Bee-lieve' Stamp/Die Duos set, Quilted Honeycomb Background Die, and Double Stitched Rectangles Dies were used again, along with the A2 Landscape Card Base with Layer Dies and the Matting Rectangle Die. What I LOVE about the Quilted Honeycomb Background Die is that both the frame and cut-outs are stitched, so that you have twice as many design ideas!! I created another Wrinkle Free Distress panel, this time with mustard and kraft inks; once dry, the panel was cut with the Quilted Honeycomb Background Die and embossed. (The edges of the honeycomb cut-outs are defined in person, but the camera did not agree!) Since I used only the cut-outs for this card, I will save the frame and extra pieces for later. Tip: for each background die with frames and cut-outs such as this, I keep all of the extra parts and pieces in envelopes for later projects.
Thanks so much for visiting today!
Blessings,
Subscribe to:
Comments (Atom)


