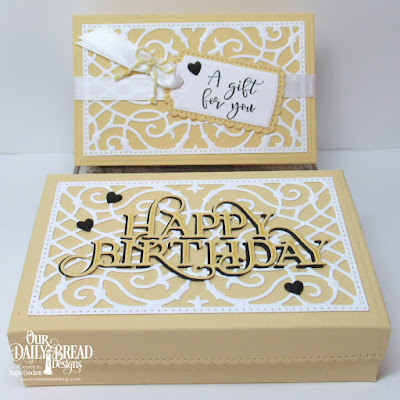
Happy Saturday, everyone! This week's Inspiration Challenge over at Splitcoast is to find inspiration from the Spoonflower site......I fell in love with this yellow lace pattern and was inspired to create a matching gift box and gift card holder. For the box, I used the ODBD Custom 'The Giving Gift Box' Dies, along with the ODBD Custom 'Happy Birthday Caps' Die. The matching gift card holder was cut from the ODBD Custom 'Gift Card Holder' Dies set with tags from the ODBD Custom 'A Gift for You' Dies set, along with a sentiment from All God's Blessings Stamp/Die Duo. The tiny hearts were cut with the ODBD Custom Clouds and Raindrops Dies. When I started out, I did not intend to use black, however, the word die was not very visible, so I added the black shadow to it then coordinated the box and gift card holder with the little black hearts.
Thanks for stopping by today!
Have a blessed weekend!
Showing posts with label Gift Tag. Show all posts
Showing posts with label Gift Tag. Show all posts
Saturday, February 10, 2018
Wednesday, March 25, 2015
North Coast Creations March New Releases!!
Hi, everyone!! Welcome to the North Coast Creations New Release party!!! I am sooooooo in love with these new sets, especially since I am a coffee-a-holic.....the stronger the better, and nothing added....just black coffee!!! :)
If you would like a chance to win a gift certificate to the North Coast Creations store for stamps, follow the instructions below:
Lori
Lisa
Julie
Sandee
Dawn
Patty
Angie....that's me!!
Wanda
NCC Blog....let us know you have finished!
My first sample for today features the 'Warm My Heart' set, along with the ODBD Custom 'Doily Dies' set. The coffee cup was stamped, colored with markers, then cut out and popped up with foam tape over a doily die by Our Daily Bread designs. The doily was adhered to a caramel panel which was rolled through my curvy crimper. I dug into my stash and found some heart eyelits which I have had at least ten years....times like these are why I do not feel guilty for being a craft supply hoarder!
My second project features the 'What's Brewin'?' set, along with the ODBD Custom 'Bookmarks' Dies, ODBD Custom 'Recipe Card and Tags' Dies, and ODBD 'Rustic Beauty Paper Collection'. To start, I cut the scalloped bookmark from the Rustic Beauty Designer Paper, adhered it to the blackberry cardstock, then trimmed the outside mat by hand. I then used a circle die to cut the opening for the bottle, then used a Scor-buddy to score where I needed it to bend. The sentiment tag was cut from the ODBD Custom 'Recipe Card and Tags Dies' set, stenciled in green, then stamped with the sentiment in blackberry ink and lined with green pearls.
Here is a view of the tag without the bottle:
Thanks for hanging out with us today!!
Blessings,
If you would like a chance to win a gift certificate to the North Coast Creations store for stamps, follow the instructions below:
Prize Information:
Just for commenting on the Design Team Blog Posts, you have a chance to win a $10 NCC Gift Certificate, good towards the purchase of NCC Stamps. You have until March 27, 2015 at 10:00 PM EDT to leave a comments on the participating designers blogs for a chance to win! Two random winners will be selected from the comments left on the designers blogs, the winners will be announced on the NCC Blog on March 28, 2015, be sure to check back there to see if you have won!
Lori
Lisa
Julie
Sandee
Dawn
Patty
Angie....that's me!!
Wanda
NCC Blog....let us know you have finished!
My first sample for today features the 'Warm My Heart' set, along with the ODBD Custom 'Doily Dies' set. The coffee cup was stamped, colored with markers, then cut out and popped up with foam tape over a doily die by Our Daily Bread designs. The doily was adhered to a caramel panel which was rolled through my curvy crimper. I dug into my stash and found some heart eyelits which I have had at least ten years....times like these are why I do not feel guilty for being a craft supply hoarder!
My second project features the 'What's Brewin'?' set, along with the ODBD Custom 'Bookmarks' Dies, ODBD Custom 'Recipe Card and Tags' Dies, and ODBD 'Rustic Beauty Paper Collection'. To start, I cut the scalloped bookmark from the Rustic Beauty Designer Paper, adhered it to the blackberry cardstock, then trimmed the outside mat by hand. I then used a circle die to cut the opening for the bottle, then used a Scor-buddy to score where I needed it to bend. The sentiment tag was cut from the ODBD Custom 'Recipe Card and Tags Dies' set, stenciled in green, then stamped with the sentiment in blackberry ink and lined with green pearls.
Here is a view of the tag without the bottle:
Thanks for hanging out with us today!!
Blessings,
Labels:
Bookmark,
Gift Tag,
NCC,
North Coast Creations,
ODBD,
ODBD Custom Cutting Dies
Friday, January 23, 2015
Inspired Candy Pail
Hi, everyone! Today's Friday Free4All Challenge over at Splitcoast is to find inspiration from this heart cake photo. I created a tag to decorate this yummy tin of candies (the tin came from the $1 Spot at Target....score!!!) The heart was cut from a Spellbinders die, the first half of the sentiment is from 'Poinsettia Tag Set' (retired) by Our Daily Bread designs, and the 'Angie' stamp is something I found at a flea market years ago. The cellophane bags and ties came from Michael's and the tag was tied onto the tin with silver cord.

Thanks so much for visiting!
Blessings,

Thanks so much for visiting!
Blessings,
Labels:
Friday Free 4 All,
Gift Ideas,
Gift Tag,
Hearts,
Love,
ODBD
Sunday, January 18, 2015
Rock Star Thank You!
Hi, everyone! Today's Featured Stamper over at Splitcoast is Claudia aka cjzim.....congrats, Claudia!! Check out this cool star-shaped chipboard ornament from her gallery....love it! Instead of an ornament, I made a shaped card with the ODBD Custom 'Sparkling Stars' Dies, then puched a hole and made a tag for this plate of 'Thank You Cookies' for a friend. The image from 'Rock Star' was stamped in navy onto kraft, cut out with the same die set, then popped up over the designer paper from the ODBD 'Patriotic Paper Collection'.
Here is a close up of the front of the card/tag:
I used the ODBD 'Patriotic Paper Collection' on the inside also, along with a sentiment from the 'Mini Tag Sentiments' set.
Thanks for stopping by today!!
Blessings,
Here is a close up of the front of the card/tag:
I used the ODBD 'Patriotic Paper Collection' on the inside also, along with a sentiment from the 'Mini Tag Sentiments' set.
Thanks for stopping by today!!
Blessings,
Friday, March 29, 2013
Pineapple Upside Down Cake
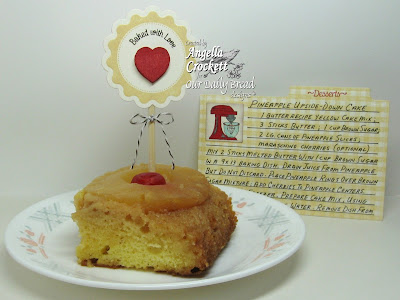
Hi, everyone! I recently made my famous (buttery) Pineapple Upside Down Cake and just had to make a tag and recipe card to go with it with the new baking sets from Our Daily Bread designs! I chose coordinating colors so that the tag and recipe card would mimic the cake.
The tag was made with the "Baking Gift Tags Set", cut out with the "Recipe Card and Tags" Die set, then adhered to a wooden skewer which I cut in half with my wire cutters.
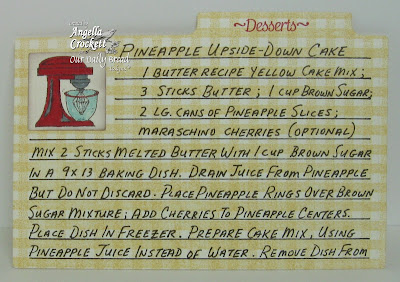
It is so easy and fun to create your own recipe cards with the baking sets from ODBD! I stamped the "Gingham Background" stamp with saffron ink onto cream cardstock first, then cut out the recipe card using the ODBD Exclusive Spellbinders "Recipe Card and Tags" die set. Using a Stamp-a-ma-jig stamp positioner, the "Recipe Card Lines", "Recipe Card Icons", and "Recipe Card Categories" were all stamped onto the card. The hard part was hand-writing the recipe! :)
Here is the front of the recipe card.....the entire recipe I will list below.....so easy and soooo good!!
***************************************************************************
Pineapple Upside Down Cake by Angella Crockett:
Ingredients:
1 "Butter Recipe" Yellow Cake Mix (Plus eggs required for cake mix.)
3 Sticks of Real Butter - 1 for cake mix, 2 for topping (I prefer salted butter.)
2 Lg Cans of Pineapple Slices (or one large and one small can.....if you want extra pineapple to eat while you are baking, use two large cans!)
Maraschino Cherries are optional.
Directions:
Mix 2 sticks melted butter with 1 cup brown sugar (or more) in a 9x13 baking dish. Drain juice from pineapple, but do not discard. Place pineapple rings in brown sugar/butter mixture; add cherries to center of pineapples. Place baking dish in the freezer. Prepare cake mix, using pineapple juice instead of water. Remove baking dish from freezer. (By freezing the butter/sugar mixture for a few minutes, it makes spreading the cake batter much easier.) Spread the batter evenly into the baking dish. Bake at 15 degrees less than the cake instructions suggest. Baking the cake will take longer than normal since it is much thicker. Use toothpick or cake tester to ensure that the cake is done in the middle. Note: the top of the cake will be brown by the time it is fully baked. After cooling for ten minutes, place cookie sheet over the dish and turn the cake upside down to reveal the pineapple goodness!! Allow to cool at least 30 minutes. Enjoy!!
***************************************************************************
I hope you try this recipe.....but let me warn you.....once your family tries this, they will require it often!!! :)
Thanks for stopping by today!
Blessings,
Labels:
Baking Sets,
Gift Tag,
ODBD,
Recipe Card,
Recipes
Subscribe to:
Posts (Atom)


